In deze blog laten we zien hoe je Real User Monitoring in Sharepoint kan opzetten met eG Enterprise. Op deze manier krijg je een volledig inzicht in de gebruikerservaring van elke gebruiker, altijd en overal, in elke browser en vanaf elk apparaat.
Wat is Real User Monitoring of RUM?
RUM is een passieve monitoring techniek om alle interacties van gebruikers met een website of web app vast te leggen. In deze blog lichten we toe welke stappen je moet nemen om RUM op de juiste manier op te zetten.
![REAL USER MONITORING DASHBOARD
Traffic
9
Page views/min
C,
- SharePoint_RUM
Visits
44
user Experience Index (Apdex)—
0.91
Sat"fed T ng
Page Load Time
0.65
JavaScr•t
man Izt
Desktop (44)
Tablet (o)
Mobile (O)
9.1
4
Errcr(s)
Response Time Breakup By Dewces
c URL
Request
Response
e 0.65s
Top Countries by Page Load Time
AVG PAGE
LOAD TIME (ms)
Unknown
VIEWS
Netvm Tirne
(ms)
83
e 449
Server Time (ms)
160
Top Page Groups by Page Load Time
Tinr (ms)
e38Q .
Content Downhad TOne
(ms)
/ SitePages/lntr
'Lists/ Agenda/
/_api/apps/
AVG PAGE
LOAD TIME (ms)
3761
2702
2632
VIEWS
3](https://www.nimble.be/wp-content/uploads/image-143-1024x530.png)
eG Enterprise doet dit door een stukje JavaScript code mee te sturen met elke pagina die de gebruiker opvraagt. Dit betekent natuurlijk dat je de volledige controle moet hebben over de website of web app, zodat je dit stukje code in de pagina’s kan inbouwen.
Hieronder een osomming van wat je nodig hebt om RUM in te stellen voor SharePoint Online:
- De SharePoint Administrator rol in Microsoft 365.
- Toegang tot de SharePoint sites die je wil monitoren.
- Een RUM Data Collector in eG Enterprise die bereikbaar is vanaf het internet op een publieke URL en bereikbaar is vanaf je interne netwerk op een private URL. Hoe je deze aanmaakt wordt niet beschreven in deze blogpost.
![Machine generated alternative text:
o
RUM Data Collector Configuration
Search
RUM DATA COLLECTOR NICK NAME
Default Collector
DMZ_RUM_collector
Add New Collector
PRIVATE URL
: 7077
Associate Hosts
Delete Collectors
RUM DATA COLLECTOR URL](https://www.nimble.be/wp-content/uploads/image-144-1024x142.png)
Als je aan deze vereisten voldoet, kan je beginnen met het instellen van de Real User Monitoring.
Dit gebeurt in 4 stappen:
- RUM component aanmaken in eG Enterprise.
- SharePoint Online configureren zodat users het stukje code kunnen uitvoeren.
- De SharePoint Server Publishing feature inschakelen.
- De Master file aanpassen.
Stap 1: RUM component aanmaken
Om te beginnen maken we het RUM component aan in eG Enterprise. Hier wordt dan ook ineens het stuk JavaScript code gegenereerd dat we later zullen injecteren in de master file op SharePoint Online.
- Meld je aan op eG Enterprise en maak een nieuw component aan.
![Machine generated alternative text:
Admin
Infrastructure
Overview
Discovery
Agen
Tests
Groups
Seg
Service
Zones
Add/Modify
Manage/ Unmanage/Delete
View](https://www.nimble.be/wp-content/uploads/image-145.png)
2. Als type selecteer je “Real User Monitor”.
![Machine generated alternative text:
Component Information
Category
Component type
Nick name
RUM collector
Remote agent
Enable JavaScript Error Capture
Enable Resource Details Capture
Enable AJAX Request Capture
Enable AJAX Correlation
Overwrite BTM UserName
URL Exclude Pattern
URL Exclude Pattern For AJAX
URL Include Pattern
Capture UserName
Real User Monitor
SPO_RUM
Yes
Yes
Yes
O
Yes
O
Yes
none
none
O
Yes
O
No
O
No
O
No
No
No](https://www.nimble.be/wp-content/uploads/image-146.png)
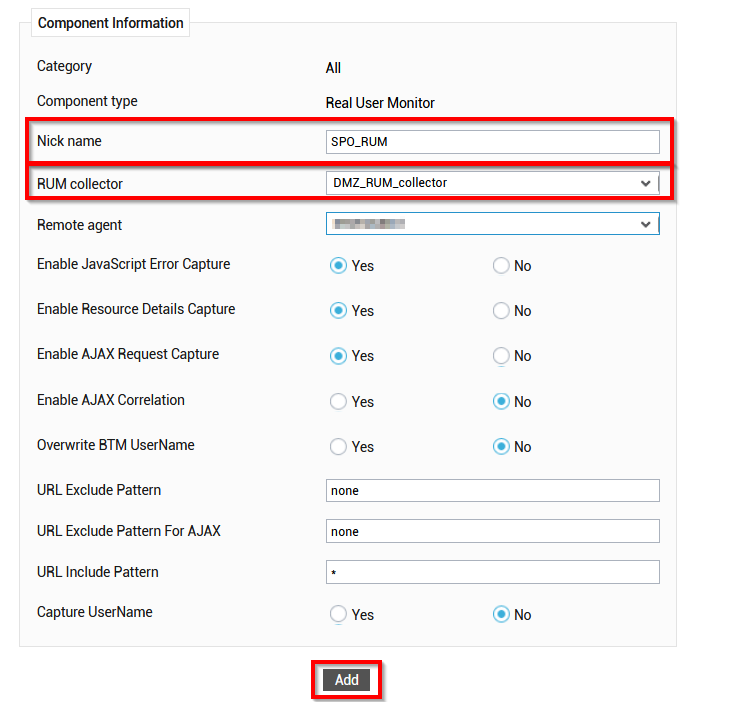
3. Geef een Nick Name in en selecteer de RUM Collector die bereikbaar is vanaf het internet. De rest van de instellingen mag je laten staan. Klik op Add om het component aan te maken.
![Machine generated alternative text:
Component Information
Category
Component type
Nick name
RUM collector
Remote agent
Enable JavaScript Error Capture
Enable Resource Details Capture
Enable AJAX Request Capture
Enable AJAX Correlation
Overwrite BTM UserName
URL Exclude Pattern
URL Exclude Pattern For AJAX
URL Include Pattern
Capture UserName
Real User Monitor
SPO_RUM
Yes
Yes
Yes
O
Yes
O
Yes
none
none
O
Yes
O
No
O
No
O
No
No
No](https://www.nimble.be/wp-content/uploads/image-147.png)
4. Eenmaal het component is aangemaakt kan je onderaan het stukje code kopiëren voor HTML pagina’s.
![Machine generated alternative text:
To instrument your html pages use the eG javascript agent
Download this if you have a Java web application that emits
HTML to the front-end. Examples: JSF, JSP, Groovy:
Download this if you have a .NET web application such as
ASPNET WC or WebForms:
Download this if you can edit the source code of your web pages.
Examples: Plain HTML, JSP with embedded HTML PHP with
embedded HTML:
Download this if want to embed this egrumjs into packaged
applications such as SAP Fiori:
Select the source file type on which eG RUM JavaScript code
snippet to be included
Include this line in your pages (html/jsp/aspx) immediately after
the head tag
Eg_RUM.dll
Code
HTML
RUM Header
Download
Download
Download
Download
Javascript
escript charset='UTF-8'
= new Date()_getTime();
windowl'Site_Name'] = '86fcefee-d5fe-4c70-947e-1 fl 9556d5144-1620155599332';
window['beacon-url'l = 'https:/
windowl egrum-config'] = 0; (function (config)
confi _ca ture =
sError:true resourceDetails:true a ax:true a axCorrelatiomfalse](https://www.nimble.be/wp-content/uploads/image-148.png)
Stap 2: SharePoint Online configureren zodat users custom scripts mogen runnen.
Nadat we het component hebben aangemaakt in eG Enterprise, is het tijd om ervoor te zorgen dat de eindgebruikers hun data kunnen doorsturen naar de RUM Data Collector. Hiervoor moeten ze custom scripts kunnen uitvoeren.
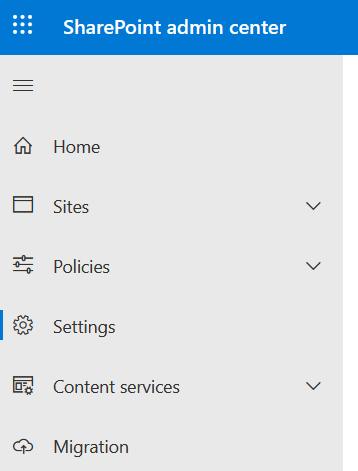
- Om dit in te stellen op SharePoint Online, ga je naar het SharePoint Online Admin Center via https://admin.microsoft.com.
2. Klik op Settings.
![SharePoint admin center
Home
Sites
Policies
Settings
Content services
Migration](https://www.nimble.be/wp-content/uploads/image-149.png)
3. Klik onderaan op de link om naar het klassieke admincenter te gaan.
4. Scroll naar beneden en zorg ervoor dat de instellingen voor “Custom Script” beide op Allow staan.
![Control whether site collection administrators can use the "Connect to a new Microsoft 365 Group" command on the
Settings menu to connect classic team sites to new Microsoft 365 groups.
Custom Scri t
Control whether users can run custom script on personal sites and self-service created sites.
Note: changes to this setting
might take up to 24 hours to take effect.
For more information, see http://go.microsoft.com/fwlinV?Linkld=397546
Preview Features
Turning off this setting will disable Preview features making them inaccessible to your users. Preview features have limited
@Allow site collection administrators to connect sites to new Microsoft 365 grc
C) Prevent users from running custom script on personal sites
@ Allow users to run custom script on personal sites
O
O
Prevent users from running custom script on self-service created sites
Allow users to run custom script on self-service created sites
Enable preview features
Disable preview features](https://www.nimble.be/wp-content/uploads/image-150-1024x192.png)
5. Klik onderaan op OK om op te slaan.
Stap 3: SharePoint Server Publishing feature inschakelen.
De volgende stap voer je uit op de site(s) die je wil monitoren. Eerst zorgen we dat SharePoint Publishing is ingeschakeld.
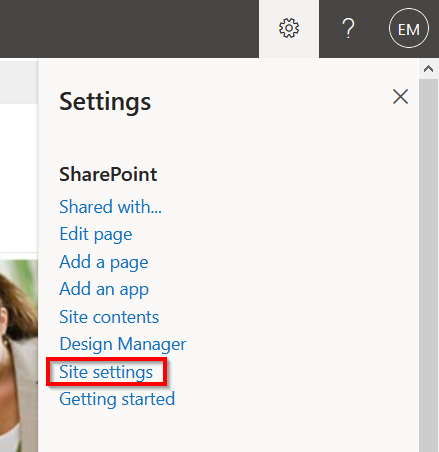
- Ga naar de site die je wil monitoren, klik linksbovenaan op het tandwiel icoontje en klik op Site Settings.
![x
Settings
SharePoint
Shared with...
Edit page
Add a page
Add an app
Site contents
Design Manager
Getting started](https://www.nimble.be/wp-content/uploads/image-151.png)
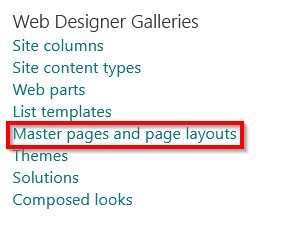
2. Als je op de Site Settings pagina de “Master pages and page layouts” en “Master page” links kan zien, kan je de rest van deze stap overslaan. SharePoint Publishing is dan reeds ingeschakeld.
![Site Settings
Users and Permissions
People and groups
Site permissions
Site collection administrators
Site app permissions
Web Designer Galleries
Site columns
Site content types
Web parts
Master pages and page layouts
Solutions
Composed looks
Look and Feel
Master page
n, and logo
Page layouts and site templates
Welcome page
Device Channels
Navigation Elements
Change the look
Import Design Package
Navigation
Image Renditions
Sitc Actions
Manage site features
Reset to site definition](https://www.nimble.be/wp-content/uploads/image-152.png)
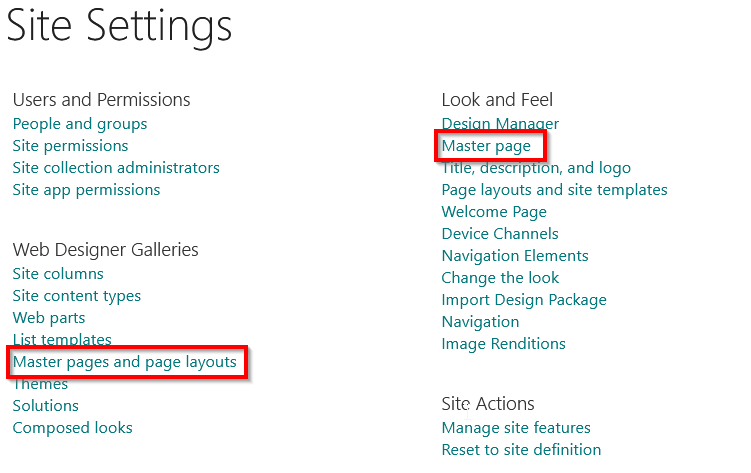
4. Indien niet, scroll verder naar beneden en klik op “Site Collection Features”.
![3nnect10ns
Site Collection Administration
Recycle bin
Search Result Sources
Search Result Types
Search Query Rules
Search Schema
Search Settings
Search Configuration Import
Site collection features
e rerarc y
Site collection navigation
Site collection audit settings
Audit log reports
Portal site connection
Content Type Policy Templates
Site collection app permissions
Storage Metrics
Popularity and Search Reports-Alert"
Content type publishing
Site collection output cache
Variations Settings
Variation labels](https://www.nimble.be/wp-content/uploads/image-154.png)
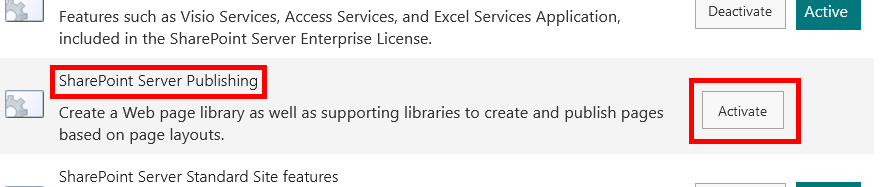
5. Scroll naar beneden naar “SharePoint Server Publishing Infrastructure” en klik op “Activate”.
![ShareP0int Server Enterprise Site Collection features
Deactivate
Features such as InfoPath Forms Services, Visio Services, Access Services, and Excel Services Application, included in the SharePoint Server Enterprise License.
SharePoint Server Publishing Infrastructure
Activate
Provides centralized libraries, content types, master pages and page layouts and enables page scheduling and other publishing functionality for a site collection.
SharePoint Server Standard Site Collection features
Deactivate
Active
Active](https://www.nimble.be/wp-content/uploads/image-155-1024x130.png)
6. Ga terug naar de Site Settings pagina en klik op “Manage site features”.
![Site Actions
Manage site fëatuœs
se a s. e e ln. Ion](https://www.nimble.be/wp-content/uploads/image-156.png)
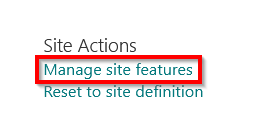
7. Scroll naar beneden naar “SharePoint Server Publishing” en klik op “Activate”.
![Features such as Visio Services, Access Services, and Excel Services Application,
included in the Sharepoint Server Enterprise License.
SharePoint Server Publishing
Create a Web page library as well as supporting libraries to create and publish pages
based on page layouts.
SharePoint Server Standard Site features
Deactiva te
Activate
Active](https://www.nimble.be/wp-content/uploads/image-157.png)
Stap 4: Master file aanpassen
Nu SharePoint Server Publishing ingeschakeld is, zijn we klaar om het blokje code in de master file te steken.
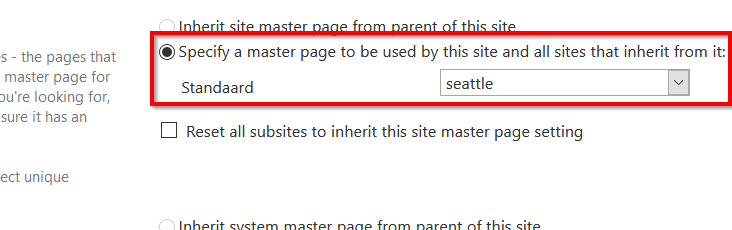
- Ga terug naar de Site Settings pagina en klik op “Master page”.
![Look and Feel
Desi n Vana er
Master page
e, escrip Ion, and logo
Page layouts and site templates
Welcome Page
Device Channels
Navigation Elements
Change the look](https://www.nimble.be/wp-content/uploads/image-158.png)
2. Noteer de naam van de Master page. Dit is de file die we gaan moeten aanpassen.
![s • the pages that
master page tor
hire looking for,
sure it has an
ect unique
@Specify a master page to be used by this site and all sites that inherit from it:
Sta rd
seattle
Reset all subsites to inherit this site master page setting
mactør from mrent of this citø](https://www.nimble.be/wp-content/uploads/image-160.png)
3. Ga terug naar de Site Settings pagina, en klik op “Master page and page layouts”.
![Web Designer Galleries
Site columns
Site content types
Web parts
List tem lates
aster pages an page ayouts
emes
Solutions
Composed looks](https://www.nimble.be/wp-content/uploads/image-161.png)
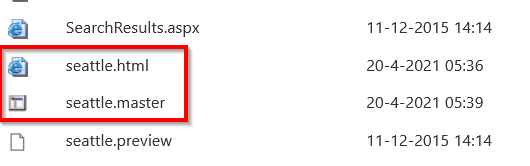
4. Zoek de HTML en Master file
![SearchResults,aspx
seattle.html
seattle.master
seattle.preview
11-12-2015 14:14
20-4-2021 05:36
20-4-2021 05:39
11-12-2015 14:14](https://www.nimble.be/wp-content/uploads/image-162.png)
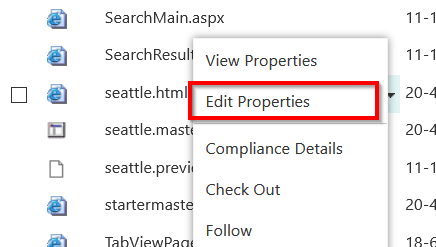
5. Voordat we de Master file kunnen aanpassen, moeten we deze eerst loskoppelen van de HTML file. Klik op het pijltje aan het einde van de filename, en klik op “Edit Properties”
![SearchMain.aspx
SearchResu View properties
seattle.htm
Edit Properties
seattle.ma
Compliance Details
seattle.p
Check Out
startermast
Follow
TahvipwPA
11-1
11-1
20-4
11-1
20-4](https://www.nimble.be/wp-content/uploads/image-163.png)
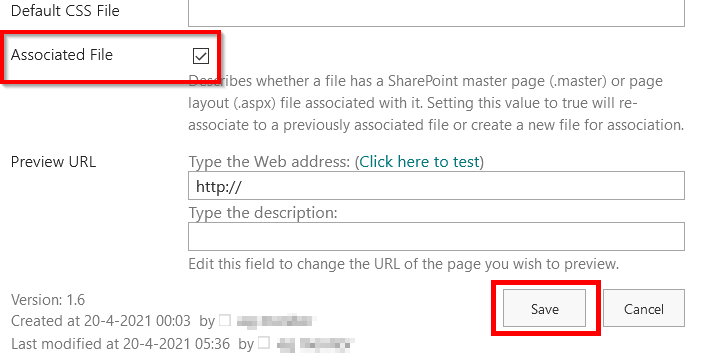
6. Ga naar “Associated File” en zet het vinkje uit. Klik op Save om op te slaan.
![Default CSS File
Associated File
Preview URL
Version: 1.6
ibes whether a file has a SharePoint master page (.master) or page
layout (aspx) file associated with it Setting this value to true will re-
associate to a previously associated file or create a new file for association.
T the Web address: (Click here to test)
http://
the descri tion:
Edit this field to change the LIRL Of the page you wish to preview.
Cancel
created at 20-4-2021 00:03 by -
Last modified at 20-4-2021 05:36 by —](https://www.nimble.be/wp-content/uploads/image-164.png)
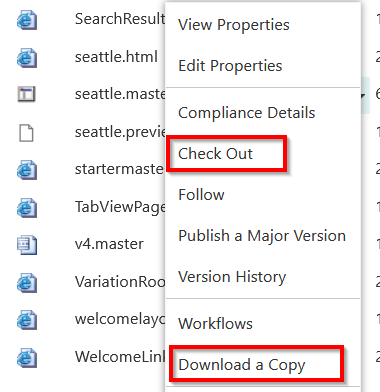
7. Klik op het pijltje aan het einde van de master file en klik “Check Out” en daarna “Download a copy”.
![Search Resu
seattle.html
seattle.m ast
seattle.p
startermast
TabViewpa
v4.master
VariationRo
welco mela
WelcomeLinl
•hew properties
Edit properties
Compliance Details
Check Out
Follow
publish a Major Version
Version History
Wo rkflows
Download a Copy](https://www.nimble.be/wp-content/uploads/image-165.png)
8. Open het bestand in je favoriete editor, zoek naar de “</head>” tag en plak het stukje code dat je in Stap 1 kopiëerde hier vlak boven. Pas niets anders aan in deze file!
![<Sharepoint:CssRegistration css" runat="server"
<script charset='UTF-8'
window[ •egrum-start time'] — new Date() .getTime();
window[ • site_Name'] = '86fcefee-d5fe-4c7ø-947e-1f19556d5144-162ø1555993
beacon-url ' ] ;
egrum-config']) window[ egrum-config•] — {}; (function • (con
(script src=•https://——•XÄi••.••Wk&:7ø77/rumc011ector/egrum.js
y on as change-"if (typeof(_spBodyonHashChange)
' undefined') _spBodyonHa](https://www.nimble.be/wp-content/uploads/image-166.png)
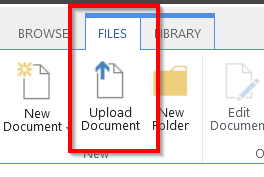
9. Terug op SharePoint, klik je bovenaan op Files en dan op Upload Document.
![BROWS
Nen
Document
FILES
Upload
Document
eu
Documen](https://www.nimble.be/wp-content/uploads/image-167.png)
10. Selecteer de aangepaste Master file en klik OK.
![Add a master page
Choose a file
Destination Folder
Version Comments
Browse...
seattle.master
Add as a new version to existing files
Choose Folder„,](https://www.nimble.be/wp-content/uploads/image-168.png)
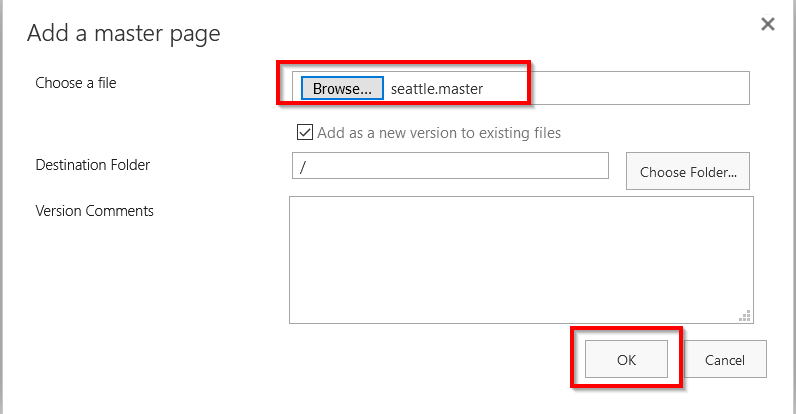
12. Zorg dat als “Compatible UI Version(s)” 15 is geselecteerd en klik “Check In”.
Associeer het master bestand niet terug met de HTML file! Dit zorgt ervoor dat je stuk code terug uit de master file verdwijnt.
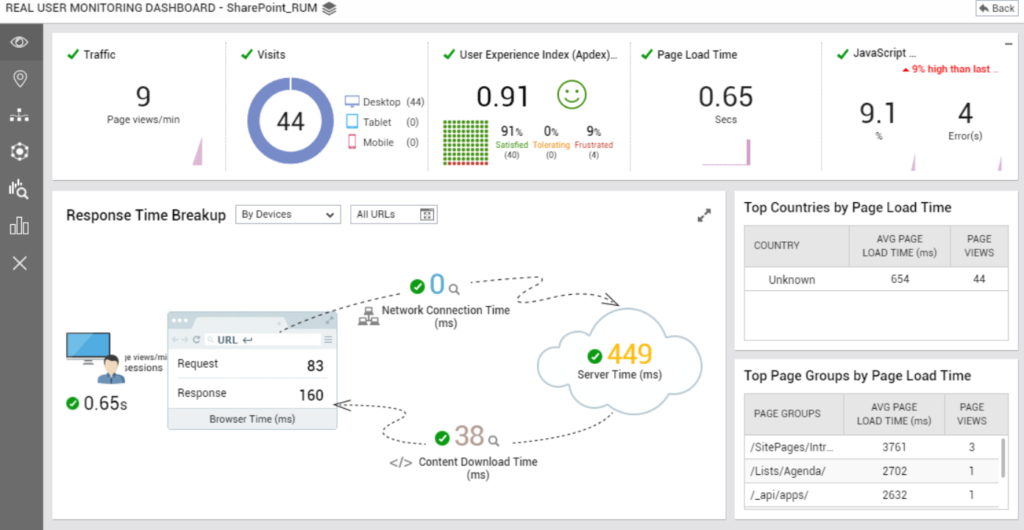
Stap 5: RUM component measures controleren in eG Enterprise
Na enkele minuten zal de data beginnen binnenkomen in eG Enterprise.
![【 5 の
N ) ( を を 一 当 よ 望 一 き 岩 ヒ s 第 •6 & ま 一 s 、
を abe を き 」 & を - hab & を 」 品 2 「 、
含 を 6 を ) 2 ミ - 潟 0 一 2 d 、
( 」 当 第 を ) の を - h & 電 d と 」 2 も 「 、
を を abed leu"0N 、
0 当 コ N ) 霎 当 & & ! 当 一 」 、
簍 00 耆 0 あ x を ー き を を d ま n
ÄUJnN) 望 を a る 1 、
を & 電 を え を & & ま 一 S 、
q - ミ - N ) 薹 当 a6ed を 、
、 型 》 g2d36 」 市 要 0 あ
(JaqunN) a 」 8 d 、 、
ま uo と ; ま き 品 0
、 ゑ 三 uns 3 あ
の 当 」 0 」 d あ 当 一 Od 箜 0 を お に 0 の 00W 言 讐 、 、
( 2 う ・ 2 さ n ) 2 さ コ 、
き 一 ゑ 一 き 鬱 当 OH ・
一 向 き 当 、 Od 当 、
~ 6 を 8 、 、
sdno 」 9g&・)
工 凵 u る da お q の 、
- 萋 ou さ コ 、
d 。 を 当 、
と 3 0 あ ・ )](https://www.nimble.be/wp-content/uploads/image-169-1024x405.png)
Dit besluit deze how-to, om eG Enterprise Real User Monitoring op de juiste manier op te zetten. Heb je na het lezen van dit artikel nog vragen? Contacteer ons gerust via onderstaand formulier. Wij raken niet uitgepraat over de mogelijkheden om naar een moderne werkplek te gaan. Maar nog liever luisteren we naar jouw verhaal!